Dear Illustrator:
You’ve been hired to create illustrations for a book! Awesome! Maybe it’s a children’s book, charts and graphs, accent illustrations, or epic cover artwork—whatever you’re drawing, let’s make sure you’re on the road to success before you even put the stylus to the screen!
Before You Start Sketching
To save yourself a lot of time and heartache, it is best to get a full-picture idea of how your illustrations are intended to be used.
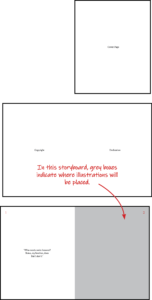
In an ideal situation, the author and/or graphic designer will have a loose storyboard (maybe even with drawn stick figures!) prepared for you. This will help you understand where your images are intended to go and where text will be placed in relation to them.
If you do not receive a storyboard layout, inquire about having one made for you.
View our video guide about creating a storyboard using Canva.com.
Information to Collect
- Know the required dimensions (typically in inches) of the needed artwork.
- How many illustrations will be created?
- Will the cover require its own, unique artwork? If so, will it stretch across the entire cover (front, spine, and back cover?)
- What is the deadline? Keep in mind, a children’s book design process begins only after your artwork is completed. The artwork deadline will be much earlier than the author’s publishing deadline.
Keep in Contact
The graphic designer is your friend! Keep them informed of your progress and include them in your correspondence with the author. Both the designer and the author will have input, although the author’s word will be the final say.
Clear communication between all parties will keep the process moving as smoothly as possible.
Setting Up Digital Artwork
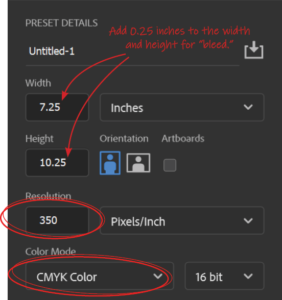
- Check that your dimensions are correct. What will the printed size of this document be?
- Account for bleed (the part that will be trimmed off). Add an additional 0.25 inches to the width and height.
- The document must be in CMYK color mode.
- The PPI (Pixels Per Inch) should be 350 PPI. (The art will be printed at 300 PPI, but the additional resolution is useful in the case that the artwork ever need to be made larger.)
Creating a Composition
When sketching, keep all important subjects well away from the edges of the canvas. Remember, the edges will be trimmed off!
- Do you need to allow additional negative (blank) space for text to go into? The text will become part of the overall composition, so you may want to place a filler text in that area.
- Will your image wrap around a book, onto the spine and the back? If so, do not place important elements where the spine or the back cover text will go.
Exporting Files
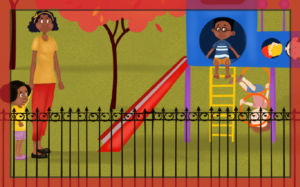
On full-page illustrations (such as this children’s book), the “bleed” will be trimmed away from the edges of the paper. Note the poor yellow-shirt kid on the playset whose head has been cut off!
- Save the files as PSD (PhotoShop Document) or
TIFF (Tag Image File Format) - Save an RGB .jpg at 150 PPI (for easy file sharing)
It is useful to begin each file name with a number. This helps the graphic designer know the intended order of the images!
(Example)
1_TheBeginning.psd
2_TheMiddle.psd
3_TheEnd.psd - Share the files. We provide a free DropBox folder to our clients to store and share the files. (They will be quite large, so email will not be the best option.)
I’m Finished—Now What?
You’ve probably worked through some revisions with the author and the graphic designer, and now you’ve submitted the final (final) versions of the artwork.
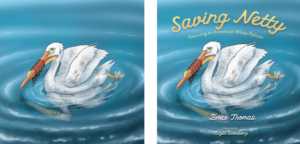
Although this illustration may seem a bit empty at first, when the text is added, everything is well-balanced.
Now, the graphic designer will place your work into InDesign along with the story text and the images will become the centerpiece of the design. When the project is published via IngramSpark or Kindle Direct Publishing, see about having an author copy (less expensive than the public version) sent to you. Now you’ve got a real-life book that you can show off in your portfolio!
Download our helpful, free-to-download checklist here:
2021_BGD_A-Guide-for-Illustrators
Need help with your book formatting and self-publishing?
Once the illustrations and manuscript are finished we are happy to help you prepare the book for distribution. Email us via our Contact page or set up an appointment to discuss your book.






2 Comments