When Self-Publishing, a Good Editor Is Crucial
There is so much that goes into self-publishing a book. Of course, you must complete the writing process. Then, there’s the editing, proofreading, cover design, and interior design, not to mention the actual self-publishing process. As the author, you’re the expert on your subject and how your information should be conveyed to the world. Whether your book is a novel, a children’s book, or a non-fiction book, you are the primary source for the book’s intended structure.
Analogy: Your Book Is a House
Imagine that your book is a house. Envision your dream home—a gorgeous, landscaped driveway, a large front porch, the perfect color scheme, and the exact floor plan you’ve always wanted. That hypothetical home is simply a dream. In order to achieve it, you must first start with an architectural drawing. Your floor plan will include proper measurements, a key for the symbols used (the doors and which direction they open, windows, etc.), the correct number of rooms, flights of stairs, and even the locations of toilets.
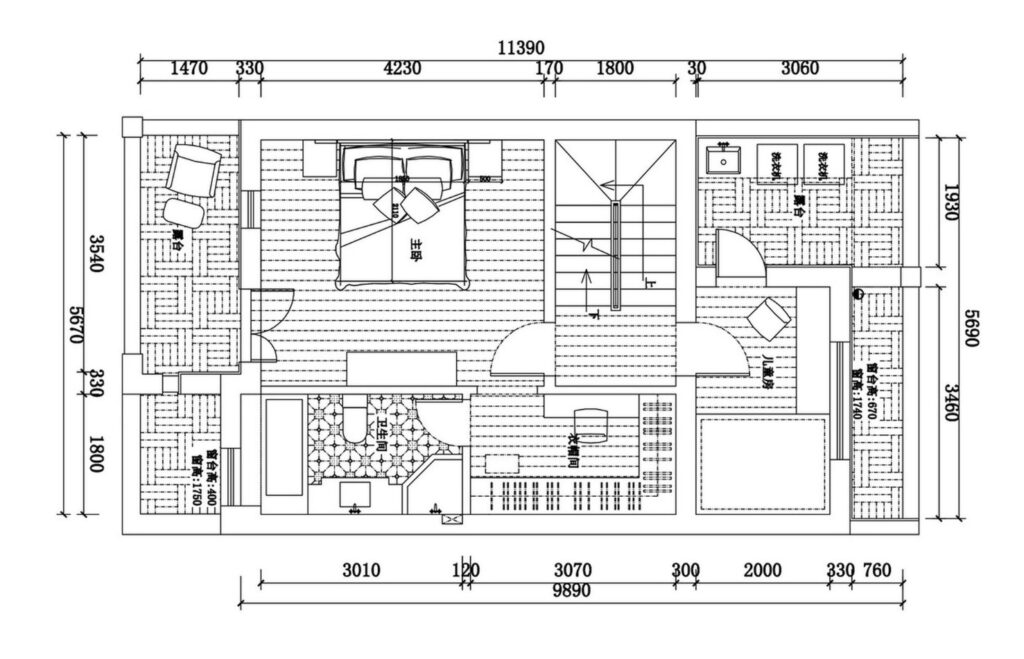
Think of your manuscript as this floor plan. It is the foundational bedrock for the rest of the project. You first need to show this floor plan to your building contractors (in our case, a professional editor, a graphic designer, and a self-publishing expert). You need to acquire quotes from them to ensure that you can afford not only the material cost of building the house (or book) but can also afford to employ their services. If you cannot, perhaps you should save for a few more years or downsize the house plan.
The Floor Plan Is Everything
Once the finances are settled and you’ve found the contractors you’d like to work with, it’s crucial to sit down with your primary contractor (your book editor) to determine that your floor plan is feasible and to make any changes BEFORE laying the foundation. This step is generally overlooked in the world of self-publishing. “It’s all digital and I can move stuff around whenever I want. Let’s go ahead and pick out the font! I can always make changes to the manuscript later, right?” Wrong.
The final visual details such as light fixtures, paint colors, and carpet (the fonts) don’t matter at all to your builder (editor). He’s there to lay concrete, frame the house, make sure the plumbing and electric are up to code, and add a roof. He’s concerned with the structure, not the design elements. The floor plans need to be completely finalized before he begins. Toward the end of the project, after the drywall guys have started, if you suddenly decide that you’d rather move the bathroom to the other side of the house, or that you forgot to add one of your kids’ bedrooms, you’re going to have to bust down the walls, call the framer back, and pay everyone for the additional work.
A Professional Editor Is Your Building Codes Expert
We see frequent occurrences of this exact scenario in the world of self-publishing. Often, an author comes to us with an “edited” manuscript. When we review the Word document, we realize that the file might have been proofread for grammatical issues, but that it hasn’t truly been professionally edited. A trained editor (or editing team—not all editors are one-stop shops!) will not only look for grammatical issues but will also check for inconsistencies in the hierarchy of the document, the structural order, the readability, and the proper format for citations, footnotes, endnotes, glossaries, and other extras.
In other words, a proofreader might check for misspelled words on your floor plan, but a professional editor (or editing team, including a line editor, developmental editor, and copyeditor) knows the correct building codes to ensure that your home will pass inspection and work as a proper living area. In general, we refer to the Chicago Manual of Style (CMOS) for all rules and regulations concerning written works and their formatting. A professional editor should adhere to these guidelines and be an expert at applying them. Skipping this step can cause major issues down the road and create unforeseen costs.
Prepping the Plan for the Designer
Working hand-in-hand with your editor, it is important that each part of your floor plan is properly labeled for the next portion—design. In a house, it’s generally pretty easy to guess each room’s intended purpose: Rooms with toilets are bathrooms, plain rooms with closets are bedrooms, and the room with garage doors is, well, the garage! As the author, it’s obvious to you what each room should be labeled. However, some rooms need a bit more distinction for the designer to understand. If things aren’t properly labeled, the designer could mistake the dining room for the living room. This is where formatting and hierarchy are vital.
For example, if you’ve labeled all the headers in your book with a bold font, but have failed to notice that the font sizes are different, how should the designer interpret this? Are the font sizes indicators of hierarchy, or is all bold font supposed to be the same? Imagine that you’ve given the designer a paint list for each room, but the instructions are slightly different. One room is labeled “tan,” one is labeled “beige,” and another is “dusty brown.” If your intention was for all three rooms to be painted the same color, the label should be consistent.
Use Paragraph Styles to Label Your Manuscript
The best way to create consistency in your book manuscript is the use of Microsoft Word’s Styles Pane. Instead of manually applying Bold + Italic, then bumping up the font size of each header, you should instead apply a corresponding Paragraph Style, generally listed as Heading 1, Heading 2, etc. Every part of the manuscript should be labeled. By default, the whole manuscript takes on the Style of Normal and gives no distinction to the designer. Since the designer can’t always magically understand your intentions, it is up to you (or your editor) to apply the correct hierarchy.
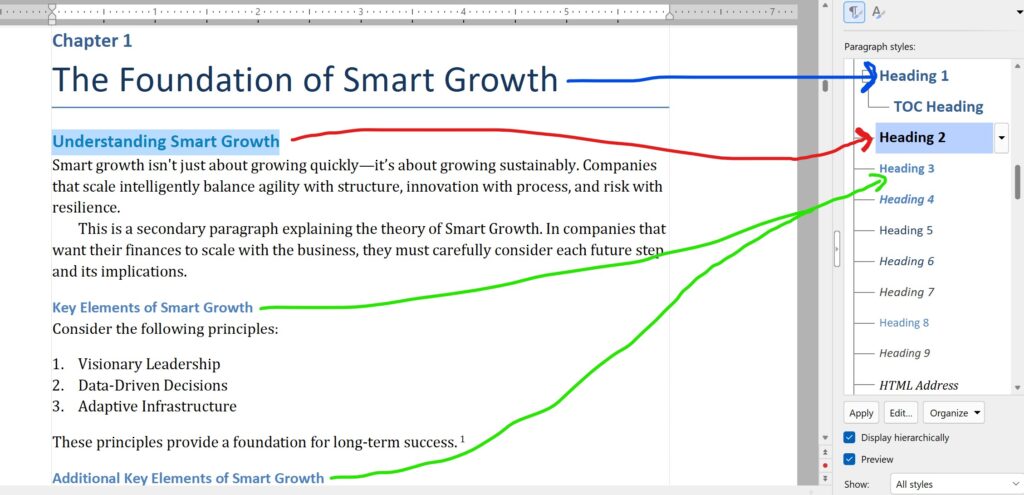
Each of the above headers have the appropriate Heading style applied to them.
As the book author, you’re not necessarily responsible for this labeling process; however, your editor should definitely be doing this as they read your manuscript. If they are able to determine and apply consistent hierarchy as they go, it ensures the book will be understandable for your audience. Below is a list of rules that any professional book editor should follow. When interviewing editors, consider asking about their process. How many of these rules do they adhere to in their typical process?
The Editor’s Golden Guidelines of Formatting a Word Doc
Download as a PDF! Interactive or printable version (PDF) of this list- Do not “hand-style” your manuscript. Instead, use Paragraph Styles.
- Understand the difference between Paragraph Styles and Character Styles. A Paragraph Style is applied to a whole paragraph, while a Character Style is applied to only one word.
- Only use the “Normal” style for your body text—nothing else!
- Do not highlight your text and click the bullet or list button. Apply the “List Number” or “List Bullet” style from your Paragraph Style panel. This creates a distinction between the two—on the designer side, they often merge together.
- Double-check your hierarchy by generating a Table of Contents or using the Outline feature. Is everything listed as you expect?
- Images should be listed on their own line; no text should appear beside an image. Do not use a text wrap. Depending on your designer’s process, they may not permit the images to remain in the manuscript before styling it; they may prefer the images sent separately. If so, the desired locations of images should be tagged as per the designer’s input.
- Footnotes or endnotes should be inserted into their respective locations using the References toolbar, not hand-typed. The footnote/endnote reference number is the small superscript number. The footnote/endnote itself is where the note or citation goes.
- All citations should follow proper Chicago Manual of Style (CMOS) rules. Remember, live links won’t exist in your printed book, so readers must have the proper information spelled out.
- Consider how and where reference material is listed in your book. There are many options: works cited, bibliography, footnotes, or endnotes.
- If you have chapter numbers and chapter titles, put these on separate lines with their own hierarchy.
- Adding a running header in Word is not necessary. Your designer will generate this dynamically.
- If you have custom All Rights Reserved lines, make sure to add these in the manuscript for use. Consider creating a custom rights paragraph if your book is offering medical, financial, emotional, mental, or other significant advice.
- ACCEPT ALL TRACKED COMMENTS AND CHANGES before submitting to designer!
Comparing Layouts
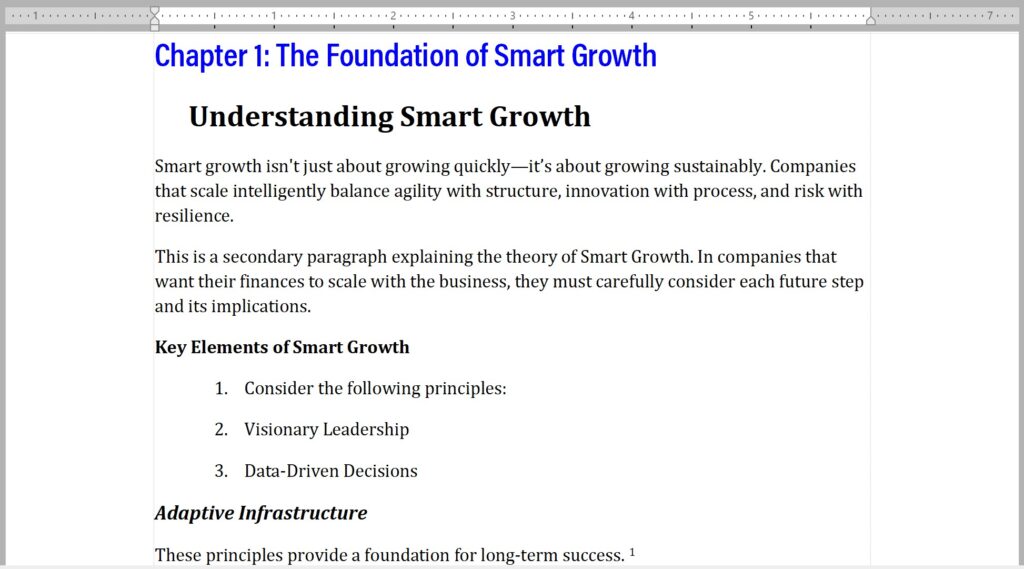
Take a look at the above “hand-styled” manuscript image. Is it obvious what the author intended for this page? There are many elements, but which ones are the main headers versus the secondary headers? Since the author hasn’t used paragraph styles, Chapter 2 will probably look slightly different from this one.
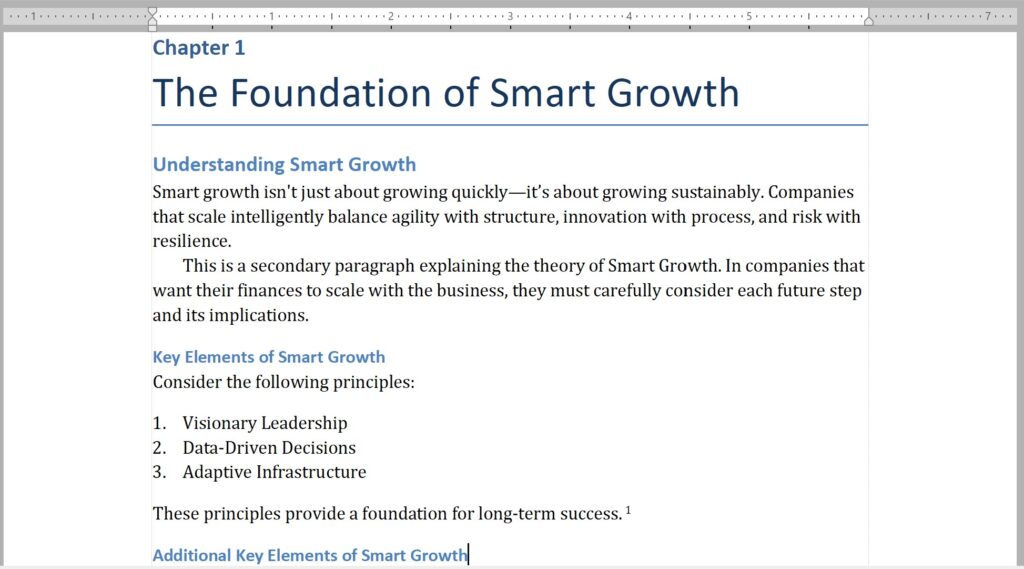
Here is the same content with good hierarchy and applied styles.
Styling and Decorating the House (the Book)

Once your manuscript is entirely finalized, correctly labeled, and ready to be decorated, then it’s time to hand it over to your graphic designer. This is when the house gets its final details. The designer paints, lays the floor, adds baseboards, and installs mirrors and ceiling fans. When you see the text styled and laid out in a book format, small errors will suddenly stand out, and that’s okay! Small design corrections, sentence restructures, and a misspelled word or two are expected. Viewing the book in a new format—especially if it’s printed on paper—will freshen your eyes to anything you previously missed.
In addition, your editor should review the designed book to ensure that nothing was missed or overlooked during the design process.
It’s likely that you’ll have a few design requests: different fonts, header styles, and accent imagery. If you decide that you’d like to change a light fixture or the paint color in one room, that’s fine! Just promise me (the graphic designer) you won’t decide to move your bedroom to the other end of the house!
Happy writing, editing, and self-publishing!
Download as a PDF! Interactive or printable version (PDF) of Editor’s Golden GuidelinesThanks to Melissa Stevens of Purple Ninja Editorial for editing this blog! You’re the best editor of all time!