So you’re considering creating illustrations for a book – Congratulations!
There is a special feeling when you see your own drawings in print!

![]() In the beginning of 2016, I had the pleasure of illustrating the gardening book Suburban Micro-Farming by Amy Stross. Each of the images I created had to illustrate the topic she was writing about and complement the photos she used. The work required research and lots of discussion to make sure I was successful in creating what she needed.
In the beginning of 2016, I had the pleasure of illustrating the gardening book Suburban Micro-Farming by Amy Stross. Each of the images I created had to illustrate the topic she was writing about and complement the photos she used. The work required research and lots of discussion to make sure I was successful in creating what she needed.![]()
A few years earlier, I was hired to create featured illustrations in the book Back Yard Farming on an Acre (more or less) by Angela England. In this case the work was easier as I was mapping out options for backyard gardens based on her suggestions – creative freedom was allowed to some degree.
![]()
These are just two examples of how you might be asked to illustrate a book. Sometimes you’re creating very specific concepts and other times there is room for artistic license.

![]() As the book designer I’ve worked with the author and illustrators on the children’s book Margarita and the Beautiful Gifts by Janet Garmen and I’ve just finished the Custom Made Kid by Amy M. Williams, a beautiful story about adoption.
As the book designer I’ve worked with the author and illustrators on the children’s book Margarita and the Beautiful Gifts by Janet Garmen and I’ve just finished the Custom Made Kid by Amy M. Williams, a beautiful story about adoption.
Preparing artwork for your book doesn’t have to be difficult but you need to know a few rules before you start. I’ve put together some helpful hints to make the process easier for you.
What to know BEFORE you create the illustrations.
- THE SIZE OF THE FINISHED BOOK – You need to make sure the images you draw will fit the book dimensions. Make sure the book size you’d like is a standard size with your printer or it’ll cost you lots of money to be unique!
- HOW MANY IMAGES YOU NEED TO DRAW – Work with the author to create a story board of the book, so you both know exactly how many images you need to create.
- BE CAREFUL TO FOLLOW PRINTER SPECS – and make sure you leave plenty of room for bleeds and don’t leave any extra marks on the drawings
- SCAN THE FINISHED ARTWORK with a high resolution printer at 1200 dpi and save to .tiff
THE PRINTING OPTIONS:
I know you’ve had this dream of holding you book for a very long time – but it’s important to understand a few things about the print and book publishing industry before you begin. The cost of the book (how much it costs to print each book) is determined by a number of things.
- trim size of the book – industry standards are less expensive than custom sizes
- cover style – soft or hard cover, with or without dust jackets
- binding – check your printer for which type(s) they offer
- cover finish – gloss or matte
- number of pages – minimum for self-publishing is 24 interior pages
- paper stock – weight, color and finish
- color vs. black and white interior – your book is considered a color interior even if you only have a few pages of colored photos or illustrations..
- AND the quantity you’re printing – the more you print at one time the less cost per book
If you choose to work with a book designer they can help you figure out these options for your book.
Now let’s get these book illustrations done.
Create a Story Board:
If you’ve never illustrated a book before the first step in creating the images is working with the author to create a story board. I recommend pulling out a pad of blank paper and sketching out each page with the words the author has written and quick drawings of what exactly is needed to illustrate the story. This might sound time consuming but your final book will be so much better if you’ve taken the time to do this!
It’s the little details that correspond with the text that make great illustration. If the text says your character has red, long hair and she picks up three apples – the illustration can’t be of a girl with short red hair and two apples. If the illustrator takes the time to ask the author detailed questions, the finished product will be a great success.
Create the Illustrations:
Back in the old days of publishing, the illustrator created the artwork and sent it off by courier to the publisher. The artwork was photographed and printing plates were made and very expensive presses printed the very expensive book!
Today we hand draw the images and scan them in high resolution and they never need to leave the studio! You can create black and white or full color images and create digital files to send to publisher.
MY TOOLS:
When I illustrate, I prefer Strathmore Smooth Bristol paper 11 x 17 pad for my illustrations. A HB pencil and an Ultra Fine Point Black Sharpie or india ink are my tools. I make sure I draw guidelines/cropmarks in the corners with very light pencil lines that NEVER cross any of my work. All my drawings must be inside of those cropmarks which are oriented correctly with the final book trim. If I’m creating an illustration that will bleed off the page I make sure the bleed is .125 inches beyond the page trim and then I make sure the bleed area is clean of any extra marks.
MAKE DIGITAL FILES OF YOUR ILLUSTRATIONS:
After I’ve created black and white drawings, I scan the images with my Epson Perfection V600 Photo scanner which is directly connected to my computer. I scan at 1200 dpi and save as a tiff image – then I open the tiff file in Illustrator and trace it.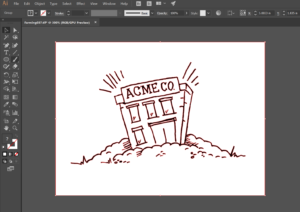
This next step is critical – click on the EXPAND TRACE to convert the traced object into paths. By doing this I now only have the black and white vector outlines of the artwork. Once you ungroup the background – any residual pencil marks are removed and I have clean lines to work with. MAGIC!
 COLOR ARTWORK DIGITALLY:
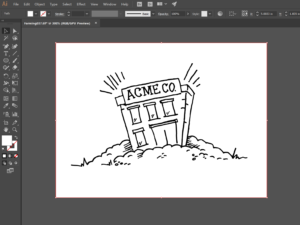
This is the point when the artwork really comes to life for me. If I’ve drawn carefully I can now color the artwork in Illustrator. Once I save the traced image it is vector artwork and I can enlarge it infinitely without it loosing quality. I save this as an eps or export it as a tiff file and place it in the InDesign book file.
COLORING ARTWORK BY HAND:
If you prefer, you many draw the artwork and color it by hand. Remember to leave clean bleed area .125 inches around all four sides of the image and create it to the correct proportions of the final book trim. Once you’ve finished the artwork you need to have it professionally scanned at 1200 dpi preferably and save as tiff or jpg. DO NOT DRAW cropmarks over the artwork even if you are SURE you know what you’re doing. Create a paper matte if you want to see how it’ll look PLEASE!
SHARE YOUR ILLUSTRATIONS WITH YOUR BOOK DESIGNER:
Once these files are created, they will need to be uploaded to a file-sharing service like DropBox because these image files will be very large.
At this point you can sit back and wait for the pdf proof of your book! Remember: books are printed in CMYK color mode and your screen is RGB so the color will be different especially on a mobile device!
PROOFING YOUR BOOK:
I highly recommend having one book printed as a proof. It’s worth the time and the expense to make sure the book is perfect! Once you see it you’ll know really fast whether you can push that bottom to publish! It’s a wonderful feeling to be DONE!
QUESTIONS:
I’ve been self-publishing books with my clients since 2006. If you have questions or would like a quote please feel free to tell me about your book here.
Becky’s Graphic Design is a participant in the Amazon Services LLC Associates Program, an affiliate advertising program designed to provide a means for sites to earn advertising fees by advertising and linking to amazon.com.
Recommended Reading for Authors:
I highly recommend these books to help you understand the world of self-publishing, marketing your book and most importantly how to SELL your book!
 Sell Your Book Like Wildfire

The Writer’s Guide to Marketing and Publicity by Rob Eagar
If you are planning on building a brand around your book – this is the book to read. Here are some of my favorite chapters:
- Establish Your Expertise
- Light a Fire in Your Readers
- Make Your Mark with an Author Brand
- Turn Media Interviews into Book Sales
- The Skinny on Social Networking
- Feed the Beast: How to use Amazon to Sell More Books
- Working with a Publisher
This book has more highlights than most of the books I’ve read – if you’re writing a book – this is the book to help you SELL IT!
Platform

Get Noticed in a Noisy World, A Step-by-Step Guide for anyone with something to say or sell by Michael Hyatt
If you self-publish you also have to self-market. You have to learn how to build a platform so you can let the world in on your secret – “I’ve PUBLISHED A BOOK!” Now learn how to sell it!
ADDITIONAL RESOURCES ONLINE:
How to prepare art for book production


3 Comments